RSS

Monday, December 19, 2011

I like the halloween allstars


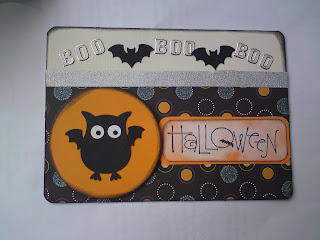
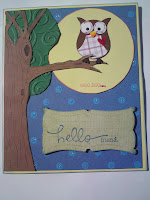
Hello and thank you for stopping by!! Sorry for being so quiet for the last few weeks and months. Work and Thankgiving and Christmascards kept me very very busy and so I did not really had time to post anything. My craftingfriend Mel ( Hi Mel lol) asked me to post some of the halloween allstar cards I made including more than one of the halloween Owl characters on one card. So here they are.


I hope you will like them and tell me what you think about them and which one is your favorite. As its the last week before christmas I will also try to post one or two of the cards I made including another project with my lovely OWL punch. (so watch out for them) ;)
I hope everyone is having a wonderful week and a blessed christmastime.
Merry Christmas to all of you and your family

Happy Crafting!!!!

Friday, October 28, 2011

I love the mummyowl

Hello and thank you for stopping by. Halloween is getting nearer and I want to show you today another Halloween character I made with the StampinUP Owl-punch .
Meet the Mummyowl.

This one is one of my favorites as he was a little challenge for me. I didn´t wanted to make the gaze out of paper, but real material. So I took some white fabric I had left over and teared them with my hands in stripes. Then I punched out a white owl body and a pair of black and white eyes. I adhered the eyes and then turned the owlbody to put some sticky-tape on it. then I tool one of the fabricstripes and started to put it arround the owl-body. I cut off the ends after adhere it to the sticky tape and made another round arround the Owlbody, but overlaped the first strip a bit with the next one.I made this step a few times until I came to the eyes-section where I tried to hide the eyes only a little under the fabric so that they would still show though. I ripped a thinner piece of fabric for the top of the mummyowl and turned it arround the ears of the owl and over the eyes. Isn´t he cute :)
Here are two cards I made with him.
Tell me what you think about them :)
I hope everyone is having a great week.
HAPPY CRAFTING :)
Maria :)

I would like to enter him in the following challenges:
thecraftypad.blogspot.com Halloween
gingerloftchallenge.blogspot.com Halloween
paperprettiesblog.blogspot.com Black/Orange/Purple/Green
pollycraftchallengeblog.blogspot.com Spooky Goings On

Thursday, October 27, 2011

I like Mr.Drac-owl-a

Hello and thank you for stopping by. A new day, a new halloween creation. I saw all the ideas that I´m showing you this week on some blogs, but unfortunately I can´t remember where exactly.( just that you know that I didn´t invent any of them myself)This time it´s getting bloody...or maybe not. Today I want to present you my little friend Mr.Drac-owl-a.
He has a little more steps to do till he is finished then the Ghouls or the bats. To create him you need to punch out 2 bodies in Black and one in red. You also need to punch out his breast out of some patternpaper and also a pair of eyes ( all with the StampinUP Owl-punch ). For his sharp teeth you just take a piece of white scrapping paper and just cut out 2 small triangles.
To put his cape together u cut off the bottom part of the owl and cut it in half vertically. they you put the red part of his cape on the black one and glue it down. Try to let the black show under the red so you can see both colors of the cape.(Works best when you cut the bottom and the vertical edge of the red part a little smaller than the black one). Adhere both parts of the coat behind the body of Dracowla. Glue on the body his breat part, on top of that the teeth and then the eyes over them.Istead of the eyeball/light-point, you can also use small rhinestones to make him look more scary.
And there he is, ready to get some bloooooood LOL


Here are some cards I made with my Dracowla :)

Tell me what you think about them :)
I hope everyone is having a great week.
HAPPY CRAFTING :)

Maria :)

I would like to enter these creations into the following challenges:
craftyourdaysaway.blogspot.com Halloween Colours
dreamvalleychallenges.blogspot.com Halloween
sentimentalsundays.blogspot.com Halloween

Wednesday, October 26, 2011

I loke this Gh-owls :)

Hello and thank you for stopping by. Today I want to show you another halloween creation I made with my StampinUp Owlpunch. Scary little Ghosts.

To make them you punch out an owl-body in white or creme cardstock and snip of its little feet ( sorry little owl). The you turn the whole body upside down and Voila, you can see the shape of a little ghost :)
give him some black eyes with white lightpoints and he is able to spooke arround. To give hime the chance to yell also you can draw a little black mouth by hand or stamp one ( like I did it with my peachykeen stamps).I made these cards with my new ghosty friends and didn´t let them spooke alone, but in a group of three :)
Here are a few of the halloweencards I made with my Ghost owls--short =Ghowls ;)


Tell me what you think about them :)
I hope everyone is having a great week.
HAPPY CRAFTING :)

Maria :)

Monday, October 24, 2011

I like this bats

Hello and thank you for stopping by. I know I haven´t blogged in about two weeks. Sorry Work kept me busy and I had some projects to work on. One of the projects is a stash of Halloweencards for my american and canadian friends. I will try to show you this week a few of them. I made a bunch of them with my favorite tool I´m using A LOT lately : My stampin Up OWL punch :)
As I haven´t blogged in 2 weeks you get more cards today. Some batty Halloween cards with my Owlpunch.

They are really supereasy to make (if you have an owlpunch)All you have to do is to punch out the owl body in black and add a pair of bat wings. These wings can be made with a scallop-punch or a bat punch or diecut. Add some eyes and he is ready to fly.When you have your OWL-bat finished you just need a good place where it can rest or fly along :)


Zentriert
These are my BAT-OWL cards!!! Tell me what you think!!
I hope everyone will have a great week.
HAPPY CRAFTING :)

Maria :)

I would like to enter these cards in the following challenge:
Kreative Stempelfreunde: Challenge 36 Halloween

Monday, October 3, 2011

I like this cute turkey

Hello and thank you for stopping by. Here in Germany we don´t celebrate Thanksgiving the way it´s done in the USA and in Canada. But as I have lots of friends in these countries I made a few cards so send to my friends. Last year arround this time on of my crafting-rolemodels Kim Burmeister made cute tablesettings with punched little turkeys. This video on her Ustreamchannel inspired me to do my own version of these turkeys. And guess what I used for it? Yes right my Owl-punch (hehehehehe).

I used it for the body and for the colorful little feathers I used for the first card

a simple scallopcircle, like Kim did and for the others my new Nellie Snellen Multi-Frame-Die that I bought on the craftfair last weekend. This Die has small cuts under the scallops that you can fold and give it a fancy look with it. I think they turned out pretty with that. Here are a few cards I made with this turkey :)


Tell me what you think about him and the cards (Which one is your favorite?) and I hope I was able to inspire you with these turkeys as well, (as Kim inspird me). Maybe you can do your own version of them too :)
I hope everyone will have a great week.
HAPPY CRAFTING :)

Maria :)

Tuesday, September 27, 2011

I like this christmas stamp

Hello and thank you for stopping by. Another day a new Christmascard I want to share with you.
For this card I used a hunter green cardstock as base and put on it some golden sparkly paper and some very nice red-christmas patternpaper on top. The image is one of my new favorite chritmasstamps I own. Its from a german company called HEINDESIGN. I just love that stamp and think it freaking cute :) I colored the image with waterbased crayons and my watertank pen. I colored the edges of the image with my stamppad in a bordeau red. To give the image some extra spot I used my liquid pearls in dark red and put it on the small reindeers nose. I layered the image on the same papers I used for the base and the other parts of the card as well.IOnce again I used for this card some of the golden holly stickers I have. I made a border with 2 of them on the left side of the card and a small one in the right left corner. To finish the card I attached 3 dark green brads.
I hope everyone will have a great week.
I hope you like the card and HAPPY CRAFTING :)

Monday, September 26, 2011

The advantage and disatvantage of a cold

Hello and Thank you for stopping by!!! Due to the fact that I caught a cold and have to stay home to recover it now...that was the disadvantage of my cold ( and that I can´t craft while I am sick ). The advantage is that I finally have the time to blog a bit more.Some of the cards I want to share with you this week will be christmascards I made before I got sick.

The first card I want to share with you is a very simple and elegant card. For the base I used a bordeau cardstock and put on it some holly-patternpaper that I cut into three pieces and let little gaps between them on the cardstock.On the little stars on the pattern paper I made little liquid pearls in the middle of each star.On the edges between the pieces I put stickerlines to give it an elegant golden touch. The golden tree was cut out from a sheet with ornaments I got years ago from a crafting colleague. I layered in on some white and red cardstock. For the finish I put two little golden hollystickers on it and finished everything with 3 golden brads on the bottom part.
Tell me what you think?
I hope everyone will have a great week.
I hope you like the card and HAPPY CRAFTING :)

Maria :)

Friday, September 23, 2011

A thousands sheets giveaway-chance

Hello and thank you for stopping by. I found the exciting news on the Blog of my friend Petra today.
Amy over at A thousand Sheets of Paper is giving away A thousand sheets of paper! Head on over to her blog via clicking on the name of Amy´s Blog above and via the photo below so you can follow the directions for entering your own chance to win part of a thousand sheets of paper! wow, what a great chance, even if you don´t have your own Blog!!

Monday, September 12, 2011

I am so very sorry!!!

Hello and Thank you for stopping by!!! I am very sorry for haven´t blogged in over a month. My new job kept me very busy and so I didn´t had much time to show you cards I created in the meantime on this blog. PLEASE forgive me!!! I will try to better myself and blog more, but I can´t promise to do it reguarly, but I will try my best.
As appology I will show you some cards I made during the past months with my new StampinUP Owl-punch that I got for my birthday this year.
First here are some cards I did with owls on it :)


And on this card for my great friend Anne-Marie ( she makes fabulous cards , make sure to check out her blog here) I made a small pinguin for her and made the card in a winter-theme as she LOVES snow ( I really don´t ;) ha )


Next are cards I used the Owl-punch, to make small tulips with it. You can find the tutorial how to make them on Valitas blog.


And finally I want to show you a card I just made this evening. As I showed you in a post a few months ago , you can also use the punch to create really cool roses. I finally took the time to make a card with (sorry Anne-Marie that its purple). I think it turned out pretty good, but let me know what you think about it, please.

Don´t hestitate to comment and let me know what you think about the cards I made with the owl-punch.
I hope everyone will have a great week.
I hope you like the cards and HAPPY CRAFTING :)

Maria :)

Sunday, August 7, 2011

I like my cardset part 7

Hello and thank you for stopping by!!! I hope everyone is having a good saturday so far. The card I want to show you today was also for the cardset I made. This time its another get well soon card. I embossed the right border of the card with a embossing-border from Cuttlebug-set "with love". I used the same folder for the borders over and under the sentiment and colored them with blue ink and blue chalk. In the mid of the flowers I put rhinestones to give it a bling. Fot the background on the left side i used some embossed patternpaper i once got from a friend for easter :) I think it matches the flower theme of the card. As last piece I added some deep blue ribbon on the bottom part of the card and tied it into a knot and some small punched butterflies to the flowerstems on the right side.
Tell me what you think?
I hope everyone is having a wonderful week
I hope you like the card and HAPPY CRAFTING :)

Maria :)

Thursday, July 28, 2011

I like roses

Hello and thank you for stopping by!!! Today I want to share some other flowers with you that I made after the tutorial of Valita. This Lady has so very many awesome ideas, you should defiently check it out here. I made these roses with my StampinUp owl-punch and I love how they turned out.
I put the white-rosé one on a barette and so you can wear it as accesoir in you hair :)

I also sent one of these on a box to a friend in Australia.

I think they would also look great on a card, will have to try that out soon.
Tell me what you think :)
I hope everyone will have a great week
Happy Crafting!!!!!
Maria :)

Wednesday, July 20, 2011

I like lilies :)

Hello and thank you for Stopping by!!! Today I want to take a break from showing you cards from my cardset and show you something different. Somewhile ago my friend Cindy showed me the Blog of a super talented Australian Lady named Valita. She showed a way to make beautiful paperlilies that are very 3D and I had to try this out :)
After I made my first Lily
I showed it to a friend and she told me that they are looking like little barettes....and BANG....An Idea was born to make smalller versions of these lilies and to glue them on small barettes from the store.
I made a whole bunch of them and colored them in different colors and sent them out to different parts of the USA and there are some actually on the way to Australia.

I also used them to give them as guest-gift to the friends that came to my B-day-Lunch. Yes, every year at my B-Day-Lunch not only I get presents but my guests get small ones too :)
But these flowers aren´t only wonderful for the hair they also look awesome on cards. I made these two cards for friends that had live in the USA and had their Birthdays a few months ago :)

I think they turned out pretty good, what do you think?
I hope you like the lilies as much as I do :)
I hope you are all having a wonderful week
Happy Crafting
Maria :)