At this Blog I want to share with you my card and crafting creations.
I love to use all kind of different techniques to craft something and to bring a bit of happiness into the life of people.
That´s my craftway to happiness!!!
Hello and Thank you for stopping by!!!
Today I´m taking part again in the Papier Turnier Bloghop which means Paper Tournament :) Judith from Austria organised this Bloghop that takes place every 2nd Thursday of the month. Because of the business of Christmas we are one week late.
You´re probably arriving from Eva or maybe you´re starting on my blog. Make sure to visit all of the blogs to get the full inspiration and ideas from all the very creative ladies taking part.
This month´s theme for the bloghop is New Year's Eve and Happy New year.
I decided to make a simple but elegant card to celebrate New Years.
The base of the card is made from thick whisperwhite cardstock. On top of that I layered a piece of silver glimmer paper and on top of that a piece of the soon comming gorgeous DSP called falling in Love from the upcomming occassions catalog for 2017 (the new year * wink wink * )
For the sentiment I heatembossed the Happy New year from the frosted Medallions Stampset in silber on a piece of vellum and added a few fireworks from the It's a Celebration stampset as well before i attached it to the card.
To finish the card off I added a few rhinestone for the special bling. What do you think?
Now have fun with the Blog Hop and have a look what the other lovely ladies created :)
Hello and Thank you for stopping by!!!
Today I´m taking part again in the Papier Turnier Bloghop which means Paper Tournament :) Judith from Austria organised this Bloghop that takes place every 2nd Thursday of the month.
You´re probably arriving from Melanie
or maybe you´re starting on my blog. Make sure to visit all of the
blogs to get the full inspiration and ideas from all the very creative
ladies taking part.
This month´s theme for the bloghop is using a punch on a project ( Handstanze in german). This months Bloghop screamed my name soooooooooooooooooo loud it was probably able to be heard all over the world lol
I´m a huge Punch fan....I have a pretty big collection of punches on my wall and I love to do punchart of all kind or to come up with my own. So there are 5 different punchart elements in this Project.
Let´s start with the front of the card. The base is a Soft Suede piece of cardstock, folded in half. On this I matted a piece of pumpkin pie and on top of this I stamped my own DSP using the maple leafes from the Perpetual Birthday Calender Set and stamped them in crushed curry, pumpkin pie, tangerine Tango, peekaboo peach and real red to create the little kinda ombre effect.
In the middle I placed a circle in craushed curry that has it´s edges inked, topped by a whisper white circle that I stamped with small colorful leafes on the bottom. I then stamped punched out a tree with the Sprinkles on Top stamp set and the tree builder punch and I put the tree crown on dimentionals.
Arround the Circle I stamped Happy Fall with the Layered Letters Alphabet Stampset in Early Espresso Ink.
Now to the fabulous inside of this card. I picked a technique that is pretty on trend right now. The Pop Up Panel card. Voila!!!
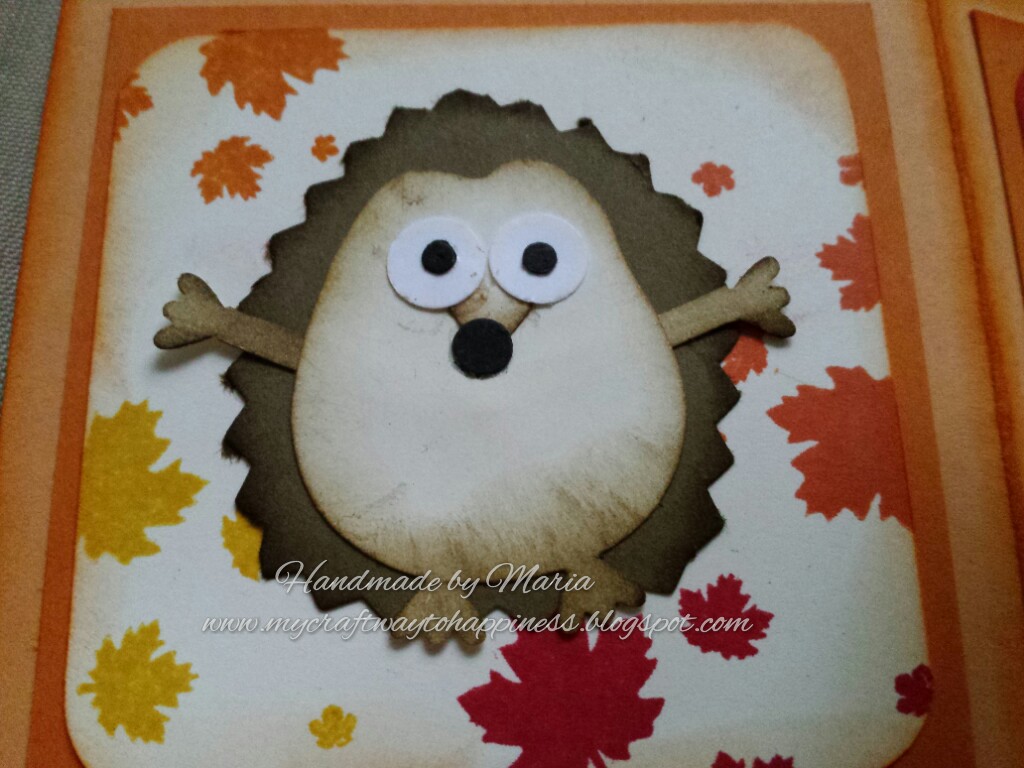
I really like these kind of cards eventhough they need a little more work to be put in them but they are totally worth it. So on to my 4 panels that pop up when you open the card. the layers are that the popup panel base is in peekaboo peach and the first matting is again pumpkin pie and then rounded edges in very vanilla and stamped with the maple leaves again. On to my punchart-buddies
Mr.M.B. Hedgeh-owl
For those that follow my blog for a couple of years this little fellow won´t be a stanger. This little guy runs by the name of Mr. M.B. Hedgeh-owl!!! He was born in 2012 ( 4 years ago wow!)He is made using the Owlpunch. I have an entire blogpost and a written and videotutorial for how to make this little guy and you can find both here.
Mr. fox
Number two on the panel is this little fox I made using the Fox Builder Punch and the fitting stampset. The eyes are again from the owlpunch. The cardstock is whisper white and pumpkin pie.
the little turk-owl
This little guy isn´t a stanger on this blog either.He is the perfect star for your thanksgiving cards. I even made 2 blogposts on him ( one once again with a video tutorial) and you can find them here and here . I used the color family DSP for the feathers and i loved how it turned out.
cute little acorn
Last but not least comes the cute little acorn punchart I came up lat year when the acorn builder punch was released together with the Acorny Thank you stampset. Isn´t he just soooooooo cute. I will make a tutorial of how to make him maybe after the awesome Onstage local event I will attend in 23 days. YAY!!! as he will be with me there and many of his siblings :)
Which of my punchcreations is your favourite? Please tell me in the comments below :)
Now have fun with the Blog Hop and have a look what the other lovely ladies created :)
Hello and Thank you for stopping by!!!
Today I´m taking part again in the Papier Turnier Bloghop which means Paper Tournament :) Judith from Austria organised this Bloghop that takes place every 2nd Thursday of the month.
You´re probably arriving from Carola
or maybe you´re starting on my blog. Make sure to visit all of the
blogs to get the full inspiration and ideas from all the very creative
ladies taking part.
This month´s theme for the bloghop is the Holiday catalogue AKA der Herbst-/Winter Katalog.
I decided to make a fall/autumn project as Christmas is still a little while to go.
As some of you know I´m a kindergarden teacher and this week I talked to my children at work about fall/autumn and what signs show that it´s about to be this nice colorful season. One of the things are the leaves changing colors, so I put this in my project, let´s see if you can spot it ;) I personally love fall/ autumn as it´s one of my avourite season with the not to hot or cold weather, the wonderful colors and of course my favourite vegetables PUMPKIN!!!
I started off with a cardbase in Pumpkin Pie (hehehehehe) and layered a piece in soft suede on top of it.
On top of that came a piece of selfmade DSP using the Vintage Leaves and once again PumpkinPie ink to stamp them randomly onto the paper. I also sponged some more to make it blend with the cardbase.
Next I diecut 2 banners from soft suede and whister white with the banner framelits. I then stamped acorn tops from the Acorny Thank you stamp set in Pumpkin Pie ink on the whisper white one and layered it on top of the second banner. On top of that came a scallop circle in the new Pumpkin Pie glimmer paper and put a whisper white circle on top of it.
In the new holiday catalog is a cute new set for halloween and fall/autumn that fits a new builder punch. If you know me , you know that i couldn´t resist but buy this punch for a lot of future projects.
The set I´m talking about is the Cookie-Cutter Halloween set (don´t miss the awesome Cookie cutter christmas set bundle either). I stamped the scarecrow on shimmer white cardstock and colored it with different fall-ish stampin up colors. Then I punched it out using the Cookie Cutter Builder punch and adhered it using a couple of dimentionals. Isn´t he just so cute?!
I then picked a sentiment from the Acorny Thank you set and bent it a little to fit the Thoughtful banners stamp set and the Banner Duo punch to punch it out. The banner was also adhered with dimentionals and my card was good to go.
What do you think?
Last month I did my first comment-giveaway and the winner was my Stampin Up! Sister Eva from Heldenstempel ( Unfortunately she was the only one that commented). Eva loved her prize though :)
I will give the giveaway another try though hoping to see more comments this time. I won´t tell you the crafty prize as it will be a surprise. To win just leave a comment and I will pick a random winner.
So go ahead and please leave a comment and let me know what you think :)
Now have fun with the Blog Hop and have a look what the other lovely ladies created :)
Hello and Thank you for stopping by!!!
Today I´m taking part again in the Papier Turnier Bloghop which means Paper Tournament :) Judith from Austria organised this Bloghop that takes place every 2nd Thursday of the month.
You´re probably arriving from Eva Osterwalder from Heldenstempel
or maybe you´re starting on my blog. Make sure to visit all of the
blogs to get the full inspiration and ideas from all the very creative
ladies taking part.
This month´s theme for the bloghop is a Colour Challenge.
The Colours we have to use on our Project are : Flirty Flamingo, Emerald Envy, Daffodil Delight .
And this is what I came up with:
I started with a Flirty Flamingo that I stamped with the Flowers from the Garden in Bloom Stampset.
I then took a piece of shimmery White cardstock and stamped the Elephant from the Love you lots Hostess Stampset on it and colored it in Tip Top Taupe. The gras I watercolored in Emerald Envy and tried to color in a shadow of the elephant as well.
I decided to give the elephant something to hold on to and decided for 3 ballons from the Balloon Celebration Stampset. I made one each in all 3 of the challenge colours. The strings are from the same stampsets just curved differently.For a little sparkle I added some wink of stella to the balloons. I also put dimentionals under the ballons to raise them up.
On the right side of the white panel stamped a friendship sentiment from the Garden in bloom Stampset. I stamped it in Flirtly Flamingo.
I matted the white panel with 2 daffodil delight scallop borders and adhered it to the cardbase. Voila I´m done! I´m quite happy with this card and I will do a giveaway of this card to one random picked person that comments under this post telling me what their favourite colour combination is. You can comment until the next thursday(18th of august) to get into the drawing for the giveaway.
Please leave a comment and let me know what you think :)
Now have fun with the Blog Hop and have a look what the other lovely ladies created :)
Hello and Thank you for stopping by!!!
Today I´m taking part again in the Papier Turnier Bloghop which means Paper Tournament :) Judith from Austria organised this Bloghop that takes place every 2nd Thursday of the month.
You´re probably arriving from Eva Osterwalder from Heldenstempel
or maybe you´re starting on my blog. Make sure to visit all of the
blogs to get the full inspiration and ideas from all the very creative
ladies taking part.
This month´s theme for the bloghop is Beach-Party.
So we will show you all projects that will bring you in the mood for the beach, sunshine, summer and more :)
I´m presenting you a special shaker card today that I combined with some punchart.
I cut the polaroid from whisper white cardstock using my paper trimmer and matted it on Island Indigo cardstock to be the center point of the card. The background is cut from DSP from the Serene Scenery paper stack from Stampin Up.
The sentiment is from the Sunshine Wishes Die set and I cut it from black cardstock and then covered it with glossy accents and let it dry. The Hello is from the Sunshine saying stampsets that coordinates with the dies.
I did some punchart with the acorn punch and the festive flower punch from peekaboo peach and flirty flamingo cards to create the small flip flops. Aren´t they so cute??
The sun was also made with the festive flower punch and I punched a bunch of the smallest petals and adhered them to a 1 3/4 inch circle also in daffodil delight cardstock and sponged the edges with the same ink. I also punched one pair of petals out of black cardstock and covered it with glossy accents.Then I added a smile using a black and red marker :)
On the inside of the shaker element I put real sand from the beach of the baltic sea, which a child of my group at work brought home for me :) I also added some small sequins in blue and silver to give it a little bit of bling and also added 3 blue sequins to the bottom of the cardbase.
I think this card has summer written all over it and I´m very happy how it turned out. Please leave a comment and let me know what you think :)
Now have fun with the Blog Hop and have a look what the other lovely ladies created :)
Hello and thank you for stopping by!
Today I have a birthday card for you that I mailed to a fellow demonstrater which is celebrating her 29th birthday again today.
She loves unicorns and as i didn't have any unicorn stamps I decided to make my own somehow.
)I then took the horse from the lunar animals from mama elephant. Colored it's hair in melon mambo and added some glitter with wink of stella and my sakura glitter gel pen. But a horse is not a unicorn so i cut a horn and glittered it too and attached it to the horse. Tadaaaaaa my selfmade unicorn!
But a unicorn is a magical creature and needs a magical world to live in. So i took some washitape and masked some sunbeams on whisperwhite paper. Then i blended all colors of the rainbow on the background as unicorns and rainbows are just meant for each other.
Then i removed the tape and got this beautiful background.
For the clouds I made a template (in lack of cloud silhouette dies) using different size punched circles that I taped together and then traced the silhouette on a piece of whisper white. I did this 2 times. Then I pierced the outline of my clouds and spobged it with soft sky ink to give it some dimension. I layered it on top of the sunburst background with dimentionals.
On the thick whisperwhite base card i traced a rectangle with the golden glitter tape we had during the saleabration. On top of it came my finished sky background.
The sentiment was cut from golden glitter paper using the hello you framelits and the birzhday stamped and cut out using the hello you stampset.
Everything attached and the card was ready to go to Austria. I hope Judith liked it and you like it as well.
Hello and Thank you for stopping by!!!
Today I´m taking part in my first ever Bloghop which is called Papier Turnier which means Paper Tournament :) Judith from Austria organised this Bloghop that takes place every 2nd Thursday of the month.
You´re probably arriving from .Janina Baltrusch or maybe you´re starting on my blog. Make sure to visit all of the blogs to get the full inspiration and ideas from all the very creative ladies taking part.
This month´s theme for the bloghop is Flowers and Blossoms :)
As many of you know I love flowers and so I loved this theme of course too :)
With the new Stampin Up Annual catalog that launched on june 1st I had a few new sets and bundles I ordered from it that i used for my card.
The base of my card is made from thick whisper white cardstock. On top of that I layered a piece of the new Irresistibly Floral Specialty Designer Series Paper that I colored with my sponge tools and ink in the colors of Real Red, Pumpkin Pie, Daffodil Delight, Old Olive, Tempting Turquoise, Dapper Denim and Rich Razzleberry. I was so happy when I saw that paper in the catalog as it´s similar to a SAB product we had in 2015.
I then cut a strip of vellum and heatembossed a sentiment of the the Over the Rainbow stampset from SU in black on it. The sentiment is about Rainbows and so it´s a connection of the colors I used on the background. I then adhered it with gluedots and tear & tape to the card.
To finish off the flowers and blossoms theme I stamped , colored and diecut some flowers and a vine from the falling flowers stampset and May flowers framelits that you can buy in a bundle. I added 3 little rhinestones to the flowers and adhered them on the vellum :)
And voila the card was done and it was a lot of fun to make it :) I hope you do like it and will give the products I used a try as well. Please leave a comment and let me know what you think :)
Now have fun with the Blog Hop and have a look what the other lovely ladies created :)
The next in the line after me is
Hello and thank you for stopping by!
Today it's only 3 more days until the big Stampin up Onstage local event in Düsseldorf. I'm so excited!
Today's card is another birthdaycard.
The base of the card is in Wisteria wonder and i stamped the Everything Eleanor swirls on it in perfect plum.
Then i used my banner dies to cut out a banner from very vanilla cardstock and I stamped it with the leaves from the rose garden stampset in Sahara Sand. I covered the edges with the glitter tape from the last saleabration and added a Sentiment from the Saleabration set Party pants. In the right top corner i stamped a pansy flower twice on vanilla cardstock with perfect plum ink and punched one of them with the pansy punch and one with a circle punch and mattet it with a perfect plum circle.
I also added some wink of stella to the flower and put it on top of the circle-flower and layered it with dimentionals.
Rhinestones arranged in the middle of the flower and the card was finished.
Please let me know what you think about it. Thanks for stopping by and happy crafting!
Hello and thank you for stopping by!
Today it's only 4 more days until the big Stampin up Onstage local event in Düsseldorf!!!!! Woohoooooooo!
Today's card is for a dear friend of mine that is celebrating a special anniversary in her life. In a few days it's been 5 years since she had beat breastcancer and that means she is cancer free.
I made a rather simple and clean card using a white cardbase on which i stamped the swirls of the Everything Eleanor stamp set in melon mambo. On top i mounted a scallop circle from vellum and two nesing circles in Melon Mambo and Whisper White. I also cut out a 5 with the big numbers dies from blushing bride glimmer paper and glued it on top.
A black sentiment from hero arts at the bottom section and some white and vellum flowers together with some nice rhinestones and my card was good to go.
It arrived at my friend yesterday and she loved it which is most important.
What do you think?
Thanks for stopping by and happy crafting!
Maria :)
Hello and thank you for stopping by!
Today it's only 5 more days until tge Onstage local event in Düsseldorf.
To make the Remarkable set posts complete I want to show you this more sad and serious card.
The cardbase is in crumbcake and covered with a layer of old olive. On top a whisperwhite layer with an image of calla lilies and a sentiment from a hero arts set.
Some simple trim on the bottom and top and this clean and simple card was ready.
Please let me know what you think.
Thank you for stopping by and happy crafting!
Maria :)
Hello and thank you for stopping by!
Today it's only 6 more days to go until the Onstage local event in Düsseldorf.
Today's card was for a friend in Utah. The main image is from the same set as the last post Remarkable You. This time its a lotusblossom that I heatembossed in white on watercolorpaper and colored with strawberry slush ink. Then I cut it using the labels collection dies and layered another label in strawberry slush under it. The background paper is retired DSP on coastal cabana.
I added some white satin taffeta ribbon,some butterflies and sentiment together with some bling and my card was good to go.
Please let me know what you think about it.
Thanks for stopping by and happy crafting!
Hello and thank you for stopping by!
This post was planned to go up 2 days ago but as life is it's busy. So only 7 days until onstage.woohoooooooo
Todays card I want to show you is a card inspired by the magnolia trees i have seen blooming around everywhere now.
The image and the leaves are from the set Remarkable you. I stamped them in archival black ink on watercolorpaper and colored the flowers. I also added a little wink of stella glitter to give it the little extra. And some Rhinestones had to be on it as well (of course) sentiments are from the german version (Grußelemente)of the tin of cards set.
Please let me know what you think.
Thank you for stopping by and happy crafting.
Hello and thank you for stopping by!
Today it's only 8 more days until the big Stampin up Onstage local event that I will attend with some wonderful crafty ladies.
Todays card is a birthdaycard I made for an awesome crafty friend in Ireland. It was her birthday last month and so I mailed her some crafty and tasty goodies and this card.
I once again used the vine i used on the national eastercards of my last posts and cut it from soon retireing Blackberry Bliss cardstock which is a very dark purple (looks almost black in the picture).
I also used 2 of the lovely flower stampsets (Flowershop and petite petals) and fitting punches(small flower and pansy) to stamp and punch a little flower bouquet on the left side of the card. A sentiment on the bottom, some rhinestones into the flowers and sequins next to the vine and my card was good to go.
What do you think?
Thanks for stopping by and happy crafting
I´m a 28 years old youth and child care worker that loves it to be creative in her spare time. I like it to bring a bit of the joy, I feel at crafting cards and other projects, into the world by sending them out.


 For the sentiment I heatembossed the Happy New year from the frosted Medallions Stampset in silber on a piece of vellum and added a few fireworks from the It's a Celebration stampset as well before i attached it to the card.