RSS

Friday, October 28, 2011

I love the mummyowl

Hello and thank you for stopping by. Halloween is getting nearer and I want to show you today another Halloween character I made with the StampinUP Owl-punch .
Meet the Mummyowl.

This one is one of my favorites as he was a little challenge for me. I didn´t wanted to make the gaze out of paper, but real material. So I took some white fabric I had left over and teared them with my hands in stripes. Then I punched out a white owl body and a pair of black and white eyes. I adhered the eyes and then turned the owlbody to put some sticky-tape on it. then I tool one of the fabricstripes and started to put it arround the owl-body. I cut off the ends after adhere it to the sticky tape and made another round arround the Owlbody, but overlaped the first strip a bit with the next one.I made this step a few times until I came to the eyes-section where I tried to hide the eyes only a little under the fabric so that they would still show though. I ripped a thinner piece of fabric for the top of the mummyowl and turned it arround the ears of the owl and over the eyes. Isn´t he cute :)
Here are two cards I made with him.
Tell me what you think about them :)
I hope everyone is having a great week.
HAPPY CRAFTING :)
Maria :)

I would like to enter him in the following challenges:
thecraftypad.blogspot.com Halloween
gingerloftchallenge.blogspot.com Halloween
paperprettiesblog.blogspot.com Black/Orange/Purple/Green
pollycraftchallengeblog.blogspot.com Spooky Goings On

Thursday, October 27, 2011

I like Mr.Drac-owl-a

Hello and thank you for stopping by. A new day, a new halloween creation. I saw all the ideas that I´m showing you this week on some blogs, but unfortunately I can´t remember where exactly.( just that you know that I didn´t invent any of them myself)This time it´s getting bloody...or maybe not. Today I want to present you my little friend Mr.Drac-owl-a.
He has a little more steps to do till he is finished then the Ghouls or the bats. To create him you need to punch out 2 bodies in Black and one in red. You also need to punch out his breast out of some patternpaper and also a pair of eyes ( all with the StampinUP Owl-punch ). For his sharp teeth you just take a piece of white scrapping paper and just cut out 2 small triangles.
To put his cape together u cut off the bottom part of the owl and cut it in half vertically. they you put the red part of his cape on the black one and glue it down. Try to let the black show under the red so you can see both colors of the cape.(Works best when you cut the bottom and the vertical edge of the red part a little smaller than the black one). Adhere both parts of the coat behind the body of Dracowla. Glue on the body his breat part, on top of that the teeth and then the eyes over them.Istead of the eyeball/light-point, you can also use small rhinestones to make him look more scary.
And there he is, ready to get some bloooooood LOL


Here are some cards I made with my Dracowla :)

Tell me what you think about them :)
I hope everyone is having a great week.
HAPPY CRAFTING :)

Maria :)

I would like to enter these creations into the following challenges:
craftyourdaysaway.blogspot.com Halloween Colours
dreamvalleychallenges.blogspot.com Halloween
sentimentalsundays.blogspot.com Halloween

Wednesday, October 26, 2011

I loke this Gh-owls :)

Hello and thank you for stopping by. Today I want to show you another halloween creation I made with my StampinUp Owlpunch. Scary little Ghosts.

To make them you punch out an owl-body in white or creme cardstock and snip of its little feet ( sorry little owl). The you turn the whole body upside down and Voila, you can see the shape of a little ghost :)
give him some black eyes with white lightpoints and he is able to spooke arround. To give hime the chance to yell also you can draw a little black mouth by hand or stamp one ( like I did it with my peachykeen stamps).I made these cards with my new ghosty friends and didn´t let them spooke alone, but in a group of three :)
Here are a few of the halloweencards I made with my Ghost owls--short =Ghowls ;)


Tell me what you think about them :)
I hope everyone is having a great week.
HAPPY CRAFTING :)

Maria :)

Monday, October 24, 2011

I like this bats

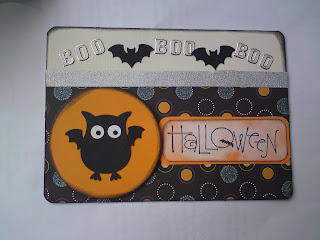
Hello and thank you for stopping by. I know I haven´t blogged in about two weeks. Sorry Work kept me busy and I had some projects to work on. One of the projects is a stash of Halloweencards for my american and canadian friends. I will try to show you this week a few of them. I made a bunch of them with my favorite tool I´m using A LOT lately : My stampin Up OWL punch :)
As I haven´t blogged in 2 weeks you get more cards today. Some batty Halloween cards with my Owlpunch.

They are really supereasy to make (if you have an owlpunch)All you have to do is to punch out the owl body in black and add a pair of bat wings. These wings can be made with a scallop-punch or a bat punch or diecut. Add some eyes and he is ready to fly.When you have your OWL-bat finished you just need a good place where it can rest or fly along :)


Zentriert
These are my BAT-OWL cards!!! Tell me what you think!!
I hope everyone will have a great week.
HAPPY CRAFTING :)

Maria :)

I would like to enter these cards in the following challenge:
Kreative Stempelfreunde: Challenge 36 Halloween

Monday, October 3, 2011

I like this cute turkey

Hello and thank you for stopping by. Here in Germany we don´t celebrate Thanksgiving the way it´s done in the USA and in Canada. But as I have lots of friends in these countries I made a few cards so send to my friends. Last year arround this time on of my crafting-rolemodels Kim Burmeister made cute tablesettings with punched little turkeys. This video on her Ustreamchannel inspired me to do my own version of these turkeys. And guess what I used for it? Yes right my Owl-punch (hehehehehe).

I used it for the body and for the colorful little feathers I used for the first card

a simple scallopcircle, like Kim did and for the others my new Nellie Snellen Multi-Frame-Die that I bought on the craftfair last weekend. This Die has small cuts under the scallops that you can fold and give it a fancy look with it. I think they turned out pretty with that. Here are a few cards I made with this turkey :)


Tell me what you think about him and the cards (Which one is your favorite?) and I hope I was able to inspire you with these turkeys as well, (as Kim inspird me). Maybe you can do your own version of them too :)
I hope everyone will have a great week.
HAPPY CRAFTING :)

Maria :)